How to Build Raised Garden Beds using Pallets A step by step guide
- Anna Papaioannou
- 5 apr. 2022
- 5 min läsning
Uppdaterat: 29 apr. 2022
Introduction
What are Garden Raised Beds?
Raised beds are garden plots above ground level and can be made either by mounding soil into a bed 30 to 35cm high without side supports or by buying or building a frame out of wood, plastic planks, or other materials. These beds are typically small enough that the gardener can walk around outside the bed and tend to all the plants without stepping into the garden bed. The ideal size for a raised bed is 100 t0 120 c, wide with the length to suit the space available. It is most often rectangular in shape and generally 140 to 160 feet long. The bed may be as much as a foot deep, depending on the type of plants being grown.

The History of Garden Raised Beds
The practice of using raised beds dates to medieval times when farmers used wattle fences (walls of woven limbs and branches) to contain their gardens. In the 18th century, the Parisian market gardeners grew vegetables in raised beds, using the plentiful horse manure of the time as fertilizer. The concept gained popularity again in the early 1970s when gardeners built raised beds with freestanding frames to encourage higher crop yields on smaller house lots. With healthy soil and proper care, raised beds can produce a large harvest in a small space.
What is this Guide about?
The following Guide is dedicated to describing step-by-step how can someone build simply their own raised garden beds, using everyday tools and principally (old/used) wooden pallets. Pallets are widely used by individuals and companies but have a small life cycle. They are shortly discarded in landfills, even though they can be used for several purposes. But are pallets recycled? One of the main reasons it is difficult to recycle wood pallets is the nails. Wood pallets are generally made with wood boards, which need to be held together somehow. Nails are the obvious solution, but they are difficult to remove from the pallets. If the nails are not removed properly, the wood can’t be turned into mulch or kindling, because the metal will mess with either the machines cutting wood or the purpose of the chopped-up wood. So, pallets with difficult-to-remove nails often go straight to landfills, because removing the nails is too much of a hassle to be worth doing.

Thus, building your own raised garden beds, using old or used pallets is a great way to give a second chance to wooden pallets before they will be thrown away and contribute towards the circular economy and 3Rs (recycle, reuse, reduce) incentives.
A step-by-step photograph illustration
The following steps are indicative and they are concerning the building of parallelogram-shaped raised garden beds, whose dimensions are 120 x 240 x 30 cm. you can use these steps, as guidance for creating your own raised garden beds of the desired size and shape. You can also use alternative materials instead of used wooden pallets, such as concrete blocks, galvanized metal, tires, liners, composite, raw or treated wood, and others. nevertheless, this Guide suggests the use of old/used wooden pallets, as a simple way to contribute to a circular economy.
STEP 1
Use the adze to dismantle the wooden pallets into parts. Keep the old nails to reuse them for assembling the garden beds. Alternatively, you can use new nails for substituting the unshaped/defective ones.
STEP 2
Use three wooden pieces and put them together. Use the hacksaw to cut bigger wood pieces into smaller parts, approximately 30 cm each. Their size depends on the length of the pallet used. Use the hammer and the nails extracted and hammer the smaller pieces on the 3 wooden parts, to compound them together Use two wood pieces -in our case will be 60 cm in length- in the corners of the wooden structure.
STEP 3
Use the sledgehammer to wedge the wood corner pieces in the soil. In our case, 30 cm will be wedged inside the ground and 30 cm will be outside. Use nails and a hammer to assemble the two sides of the structure.

STEP 4
Use the cord across the structures in order to bring them into alignment. You can tie the cord to a stable place, such as a wall or tree to calculate the distance between the structures and their right location.

STEP 5
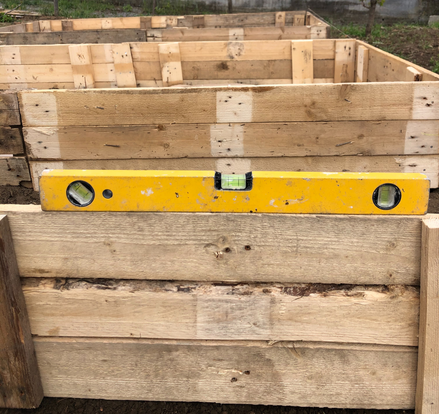
Use the spirit level to align the wooden pieces with each other as well as with the ground level. Wedge the corner wood pieces deeper in the ground when needed.
STEP 6
Use a paperboard to cover the bottom of the structure. In that way, you will protect the roots of the plants from weeds and pests. Use paperboard from old, or used carton boxes. In case you have priory used a non-woven degradable gardening weeding cloth cover, you can skip this step.
STEP 7
Use small pieces of tree trunks and logs above the paperboard and put them evenly across the structure. Tree trunks and logs will decompose gradually offering rich ingredients to your soil, thus to your plants.

STEP 8
Use the shovel in order to transfer soil inside the structure. Use as much as the soil is needed so that the tree trunks and logs are utterly covered.
STEP 9
Use compost/compost manure in order to fill the upper part of the bed. You can alternatively use plant-based fertilizers like mulch, "green" manure, vegetable compost, and chipped branch wood.
STEP 10
You can use a rake in order to spread the compost/compost manure smoothly across the structure. Diagram 1.0 can be used as an example of filling in layers of your raised garden bed.


STEP 11
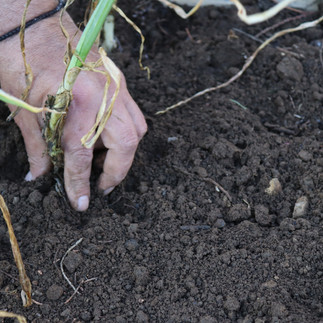
Use a wood handle accessory or a tile shovel or a clamshell digger in order to make a hole in the soil ( 5-7 cm and embed your plant inside the soil, as indicated in the photos following.

STEP 12
Water your fresh embedded plants. Keep the flow of the water low, so that you do not hurt the new plants.

Conclusion
Raised beds are a great option for pretty much any garden situation, especially if you only have a small amount of space. Raised beds are often more productive than beds in the ground because the soil is less compacted, has better drainage, and warms earlier in the spring, meaning that plants will start to grow earlier in the season. Raised beds are also often easier to maintain, particularly for people with limited mobility, and generally have less perennial weed pressure. For gardeners intent on growing their own food, the appeal of increasing vegetable and produce yields through intensive plantings is a real plus. Raised beds are the perfect setups for much closer-clustered plantings, as in the styles of square foot gardening, bio-intensive planting, and more.

Instead of having a traditional garden where much of the space is dedicated to paths or spaces for conventional row planting, you use up all your space in a much smaller container garden, and can thus grow a whole lot more in only a fraction of the space. This Guide offers a step-by-step illustrated description of how to make your own raised garden beds. In that way, anyone can easily build their own garden beds, in any preferable shape and size. Readers are encouraged to use used wooden pallets, boosting in that way materials circularity.
Find the entire guide:
Useful links


Comments